1. Install MAAS
MAAS (Metal As A Service) - provides the management of physical servers like virtual machines in the cloud. MAAS can work at any scale, from a test deployment using a handful of machines to thousands of machines deployed across multiple regions.
The typical MAAS environment includes as a framework for deployment the following:
- A Region controller interacts with and controls the wider environment for a region.
- One or more Rack controllers manage locally grouped hardware, usually within a data centre rack.
- Multiple Nodes are individual machines managed by the Rack controller, and ultimately, the Region controller.
- Complex Networking topologies can be modelled and implemented by MAAS, from a single fabric to multiple zones and many overlapping spaces.
Note
See Concepts and Terms in the MAAS documentation for clarification on the terminology used within MAAS.
1.1. Requirements
The minimum requirements for the machines that run MAAS vary widely depending on local implementation and usage. The minimum requirements for the machines that run MAAS are considered in the MAAS documentation.
The hardware that will be used for the purpose of this documentation is based on the following specifications:
- 1 x MAAS Rack with Region controller: 8GB RAM, 2 CPUs, 2 NIC (one for IPMI and one for the network), 40GB storage
Your hardware could differ considerably from the above and both MAAS and Juju will easily adapt. The Juju node could operate perfectly adequately with half the RAM (this would need to be defined as a bootstrap constraint) and adding more nodes will obviously improve performance.
1.2. Installation
First, you need to have fresh install of Ubuntu Server 18.04 LTS on the machine that will be hosting both the MAAS Rack and Region Controllers.
In our case, as a hosting machine is used VM machine created in ESXi 6.5 (VMware ESXi). You can use the ESXi client vSphere Client.
The configuration of the network is depends on your own infrastructure (see the Ubuntu Server Network Configuration documentation for further details on modifying your network configuration).
For the purposes of this documentation, the IP address configured for the MAAS machine hosted on Ubuntu is set to be 192.168.40.16.
To update the package database and install MAAS, issue the following commands:
sudo apt update
sudo apt install maas
Before MAAS can be configured an administrator account need to be created:
sudo maas createadmin
An ussername, password and email address should be filled in.
After that you need to specify if you want to import an SSH key. MAAS uses the public SSH key of a user to manage and secure access to deployed nodes. If you want to skip this, press Enter. In the next step you can do this from the web UI.
1.3. On-boarding
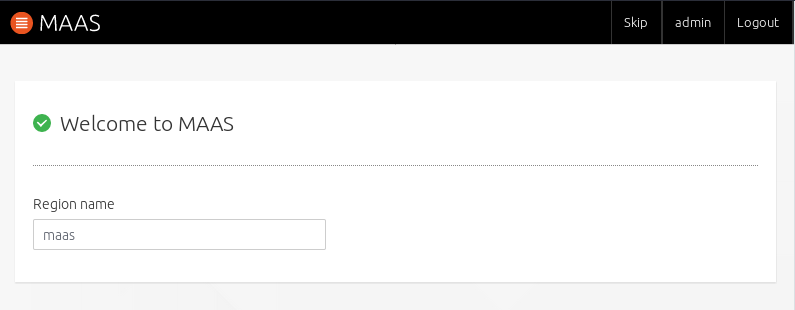
MAAS is now running without being configured. You can check this by pointing your browser to http://<your.maas.ip>:5240/MAAS/. Now you sign in with the login credentials, and the web interface will launch the ‘Welcome to MAAS’ on-boarding page:
1.4. Connectivity and images
There are two steps left necessary for MAAS to get up and running. Unless you have specific requirements, most of these options can be left at their default values:
- Connectivity: important services that default to being outside of your network. These include package archives and the DNS forwarder.
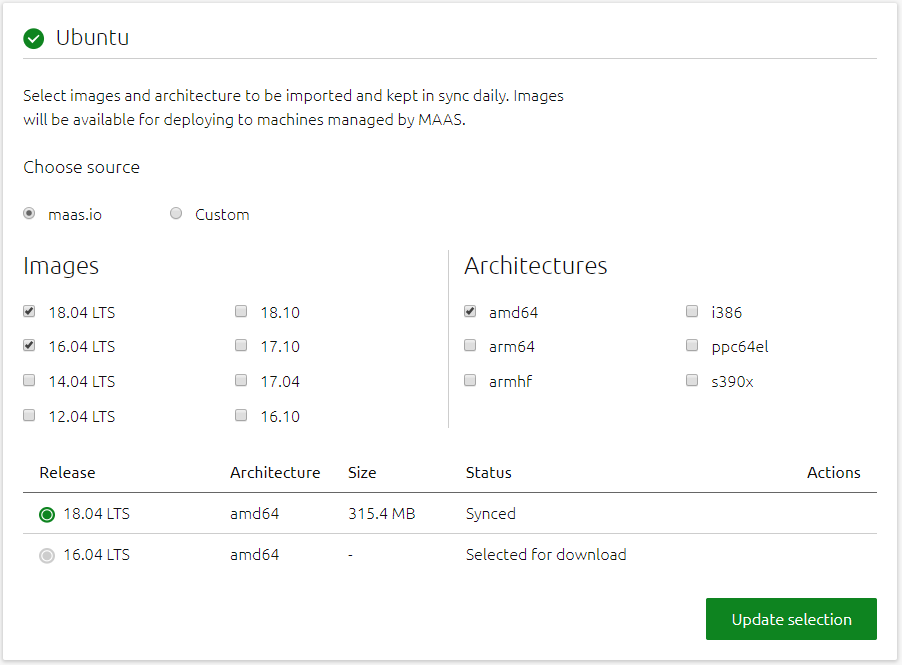
- Ubuntu: for deployed nodes, MAAS needs to import the versions and image architectures. Specify 18.04 LTS as well as 16.04 LTS to add additional image.
1.5. SSH key
You have several options for importing your public SSH key(s). One is to import the key from Launchpad or Github by entering your user ID for these services. Another option is to add a local public key file, usually HOME/ssh/id.rsa.pub by selecting Upload button and placing the content in the box that appears. Click Import to complete the setting.
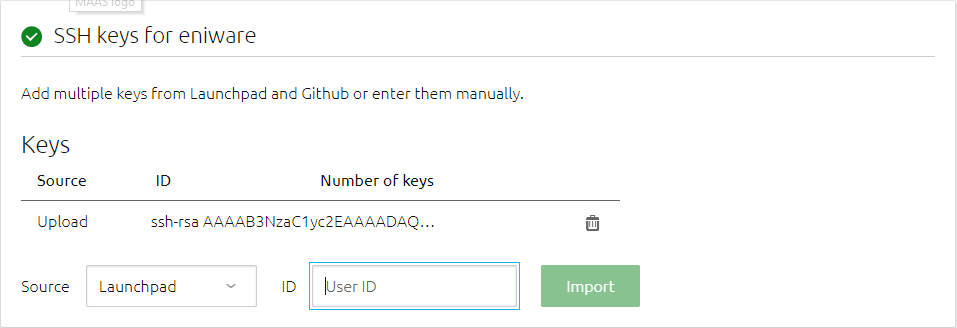
Adding SSH keys completes this initial MAAS configuration. Press Go to the dashboard to move to the MAAS dashboard and the device discovery process
You can generate a local SSH public/private key pair from the Linux account you are using for managing MAAS. When asked for a passphrase, leave it blank.
ssh-keygen –t rsa
This completes the initial setup of MAAS. Press Go button to the dashboard to go to the device discovery process.
1.6. Networking
By default, MAAS will monitor local network traffic and report any devices it discovers on the Network discovery page of the web UI. This page is basic and is the first one to load after finishing installation.
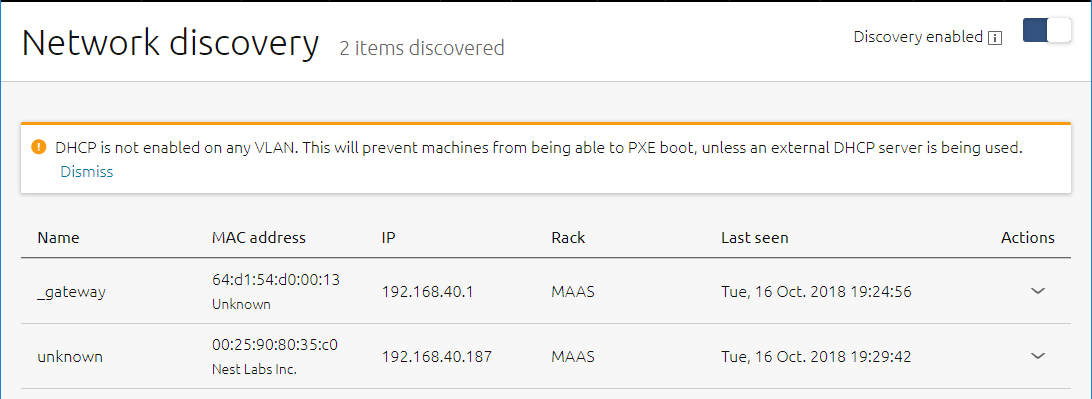
Before taking the configuration further, you need to tell MAAS about your network and how y’d like connections to be configured.
Extending a reserved dynamic IP range:
Note
If you do not have DHCP reserved ranges in your network, you can skip to the step Enabling DHCP.
If DHCP reserved ranges are defined in your network, you have to set the appropriate settings described below.
These options are managed from the Subnets page of the web UI. The subnets page defaults to listing connections by fabric and MAAS creates one fabric per physical NIC on the MAAS server. Once you are set up a machine with a single NIC, a single fabric will be be listed linked to the external subnet.
You should select the untagged VLAN the subnet to the right of fabric-0 and add in the Reserved ranges field the reserved portions of the subnet to the dynamic IP range:
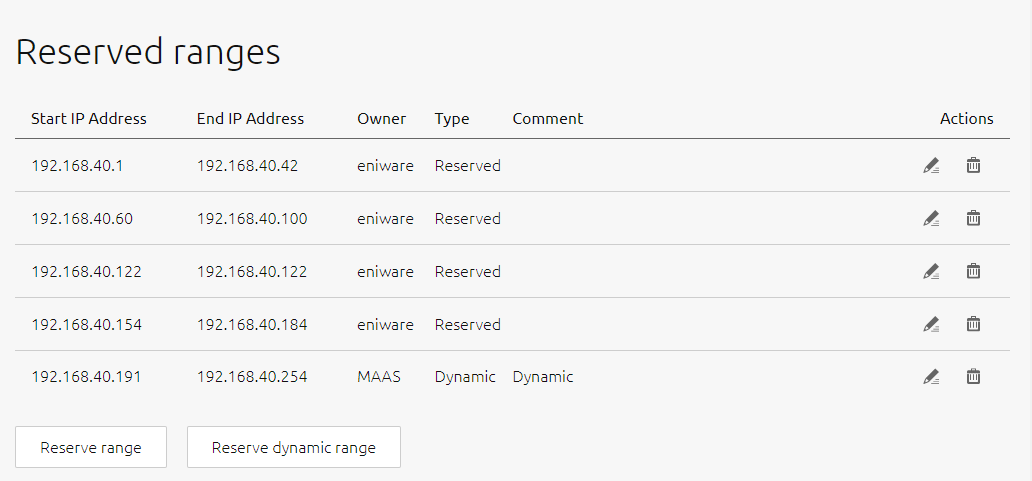
Furthermore, since DHCP is enabled on a VLAN basis and a VLAN can contain multiple subnets, it is possible to add a portion from those subnets as well. Just select the subnet under the ‘Subnets’ page and reserve a dynamic range.
Enabling DHCP:
You can add DHCP by selecting untagged VLAN the subnet to the right of fabric-0.
The page that appears will be labelled something similar to Default VLAN in fabric-0. From here, click the Take action button at the top right and select Provide DHCP.
If you do not have reserved ranges of IP addresses, a new pane will appear that allows you to specify the start and end IP addresses for the DHCP range. Select Provide DHCP to accept the default values. The VLAN summary should now show DHCP as Enabled.
If you have reserved ranges of IP addresses, a new pane will appear that shows us the current Rack controller. Select Provide DHCP to accept the settings and the VLAN summary should now show DHCP as Enabled.

1.7. Images
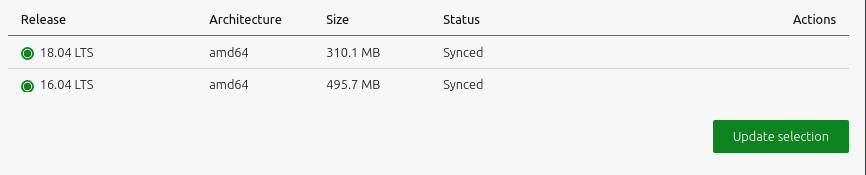
You have already downloaded the images you need as part of the on-boarding process, but it’s worth checking that both the images you requested are available. To do this, select the Images page from the top menu of the web UI.
The Images page allows you to download new images, use a custom source for images, and check on the status of any images currently downloaded. These appear at the bottom, and both 18.04 LTS and 16.04 LTS should be listed with a status of Synced.
1.8. Network services
Before adding new nodes, it is necessary to configure the network services. From the Settings menu select Network services.
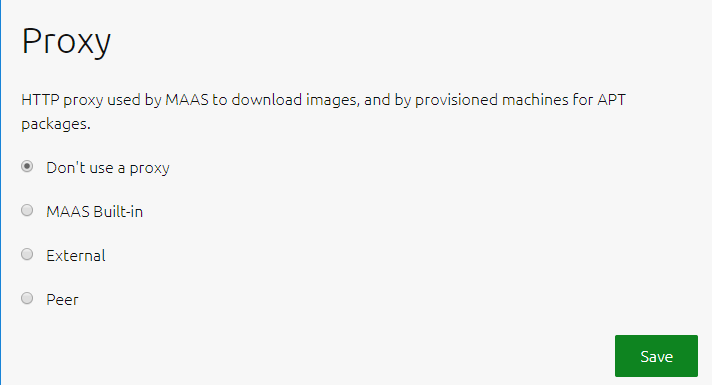
Warning
In the Proxy field for HTTP proxy used by MAAS to download images is celected MAAS Built-in by default. It is necessary to select Do not use a proxy.
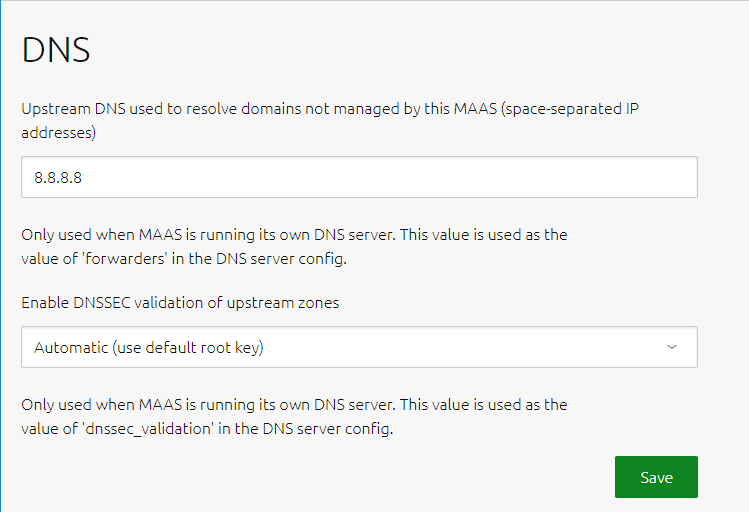
In the DNS field, it is necessary to set Upstream DNS used to resolve domains not managed by this MAAS.
In our case, we assign DNS address 8.8.8.8 (which is Google Public DNS IP addresses).
1.9. Adding nodes
MAAS is now ready to accept new nodes. To do this, first ensure your four cloud nodes and single Juju node are set to boot from a PXE image. Now simply power them on. MAAS will add these new nodes automatically by taking the following steps:
- Detect each new node on the network
- Probe and log each node’s hardware (using an ephemeral boot image)
- Add each node to the Machines page with a status of New
While it is not the most appropriate way, at this stage it is advisable to include each node individually in order to trace each one strictly.
In order for MAAS to fully manage a node it must be able to power cycle it. This is done via a communication channel with the BMC card of the node’s underlying system. A newly added node is therefore incomplete until its power type has been configured.
Note
See the MAAS documentation for more information on power types, including a table showing a feature comparison for the supported BMC drivers.
To configure a node’s power type, begin by clicking on the node from the Machines page of the web UI followed by its Configuration tab. Scroll down for Power configuration. If the power type is undefined the following will be displayed:

Choose a type in the dropdown menu that corresponds to the node’s underlying machine’s BMC card.
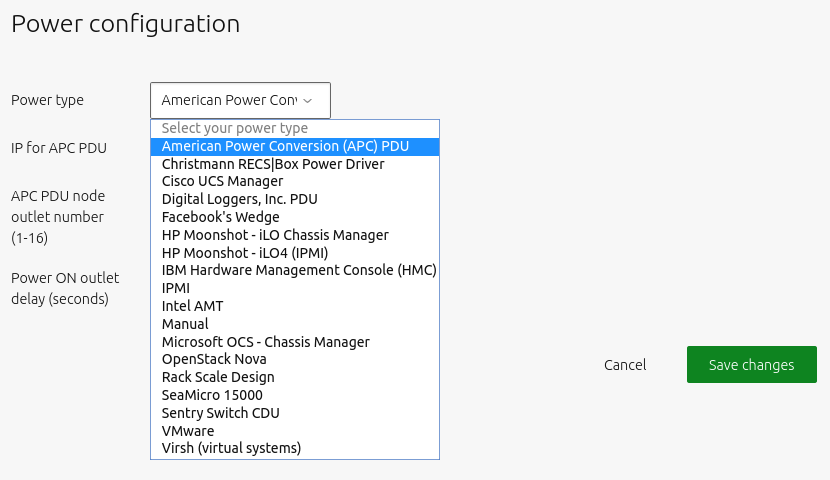
Use the drop-down Power type menu to open the configuration options for your node’s specific power configuration and enter any further details that the configuration may require. When you make the necessary changes, click Save changes. The machine can now be turned off from the Take option menu in the top right.
By default, the machine gets a random name. It is recommended that the name of each new machine be edited in accordance with its intended purpose. This can be done by selecting the corresponding machine from the Machines page. A Machine summary field opens where in the upper left corner we have to click and change the name of the selected machine and save the change with the Save button:

Warning
If you add a node (machine) and then remove it without deleting the disks, you will not be able to add this node again! To add the node manually, please see the official documentation or follow the steps outlined above in this section.
To add the node, you need the following information about your machine: the MAC address of your IPMI interface and the MAC addres of your PXE interface. After entering the information, you have to restart the processes MAAS controler and Region controler using the following commands:
sudo service maas-rackd restart
sudo service maas-regiond restart
1.10. Commission nodes
Once a node is added to MAAS (see Adding nodes) the next logical step is to commission it.
To commission, the underlying machine needs to be configured to netboot (this should already have been done during the enlistment stage). Such a machine will undergo the following process:
- DHCP server is contacted
- kernel and initrd are received over TFTP
- machine boots
- initrd mounts a Squashfs image ephemerally over HTTP
- cloud-init runs commissioning scripts
- machine shuts down
The commissioning scripts will talk to the region API server to ensure that everything is in order and that eventual deployment will succeed.
The image used is, by default, the latest Ubuntu LTS release and should not require changing. However, it can be configured in the Settings page of the web UI by selecting the General tab and scrolling down to the Commissioning section.
To commission, on the Machines page, select a node and choose Commission under the Take action drop-down menu.

You have the option of selecting some extra parameters (checkboxes) and performing hardware tests. These options include:
- Allow SSH access and prevent machine powering off: Machines are normally powered off after commissioning. This option keeps the machine on and enables SSH so you can access the machine.
- Retain network configuration: When enabled, preserves any custom network settings previously configured for the machine. See Networking for more information.
- Retain storage configuration: When enabled, preserves any storage settings previously configured for the machine. See Storage for more details.
- Update firmware: Runs scripts tagged with update_firmware. See Testing scripts for more details.
- Configure HBA: Runs scripts tagged with configure_hba. As above, see Testing scripts for further details.
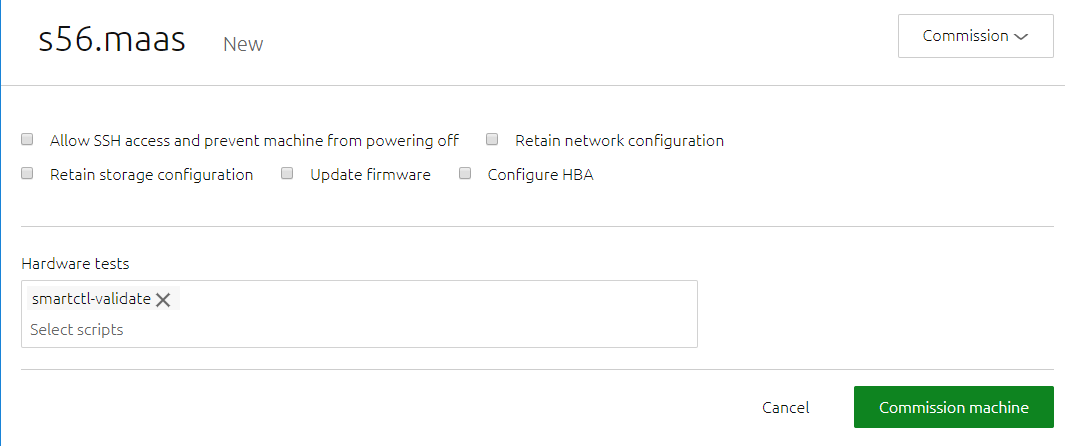
Click the Hardware tests field to reveal a drop-down list of tests to add and run during commissioning. See Hardware testing) for more information on hardware testing scripts.
From the Hardware tests field, we deactivate smartctl-validate, which will speed up work as SMART health for all drivers in paralell will not be validated.
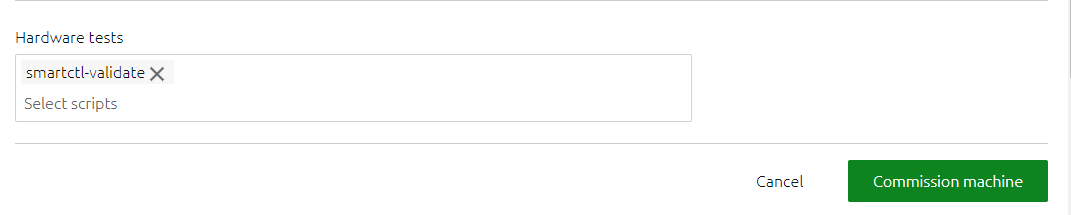
Finalise the directive by hitting Commission machine. While a node is commissioning its status will change to Commissioning. During this time the node’s network topology will be discovered. This will prompt one of the node’s network interfaces to be connected to the fabric, VLAN, and subnet combination that will allow it to be configured. By default, a static IP address will be assigned out of the reserved IP range for the subnet. That is, an IP assignment mode of Auto assign will be used.
After a few minutes, successfully commissioned nodes will change their status to Ready. The CPU cores, RAM, number of drives and storage fields should now correctly reflect the hardware on each node.
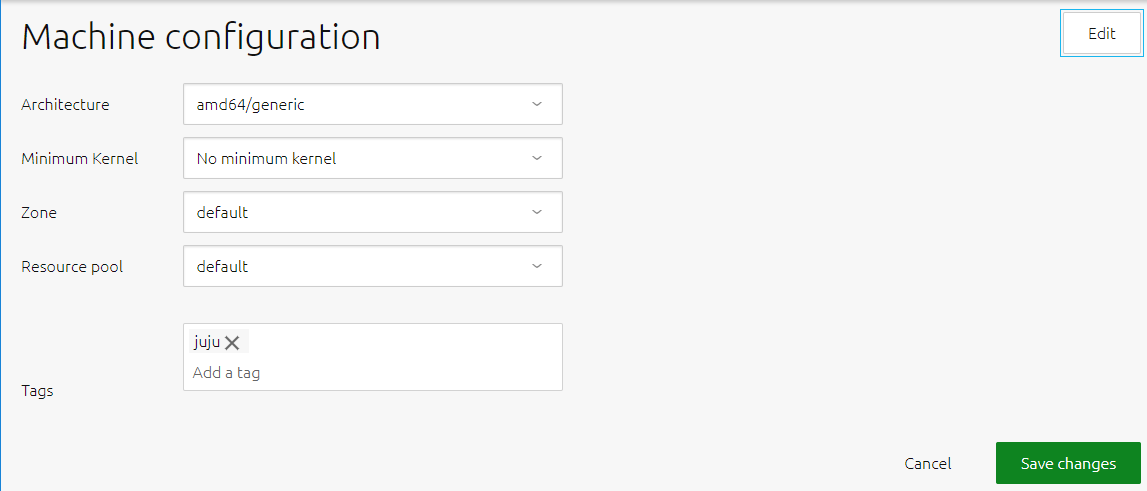
Tags are normally used to identify nodes with specific hardware, such GPUs for GPU-accelerated CUDA processing. This allows Juju to target these capabilities when deploying applications that may use them. But they can also be used for organisational and management purposes. This is how you are going to use them, by adding a compute tag to the four cloud nodes and a juju tag to the node that will act as the Juju controller.
Tags are added from the Machine summary section of the same individual node page we used to rename a node. Click Edit on the Tags section. A tag is added by activated Edit function in Machine configuration field and entering a name for the tag in the empty field and clicking Save changes.
A common picture of the state of the nodes that have already been added to the MAAS. You can see the names, tags, and hardware information on each node:
| Node name | Tag(s) | CPU(s) | RAM | Drives | Storage |
|---|---|---|---|---|---|
| os-compute01.maas | compute | 2 | 6.0 | 3 | 85.9 |
| os-compute02.maas | compute | 2 | 6.0 | 3 | 85.9 |
| os-compute03.maas | compute | 2 | 6.0 | 3 | 85.9 |
| os-compute04.maas | compute | 2 | 6.0 | 3 | 85.9 |
| os-juju01.maas | juju | 2 | 4.0 | 1 | 42.9 |
1.11. Next steps
The next step is to deploy the Juju controller onto its own node. From there, you will be using Juju and MAAS together to deploy OpenStack into the four remaining cloud nodes.